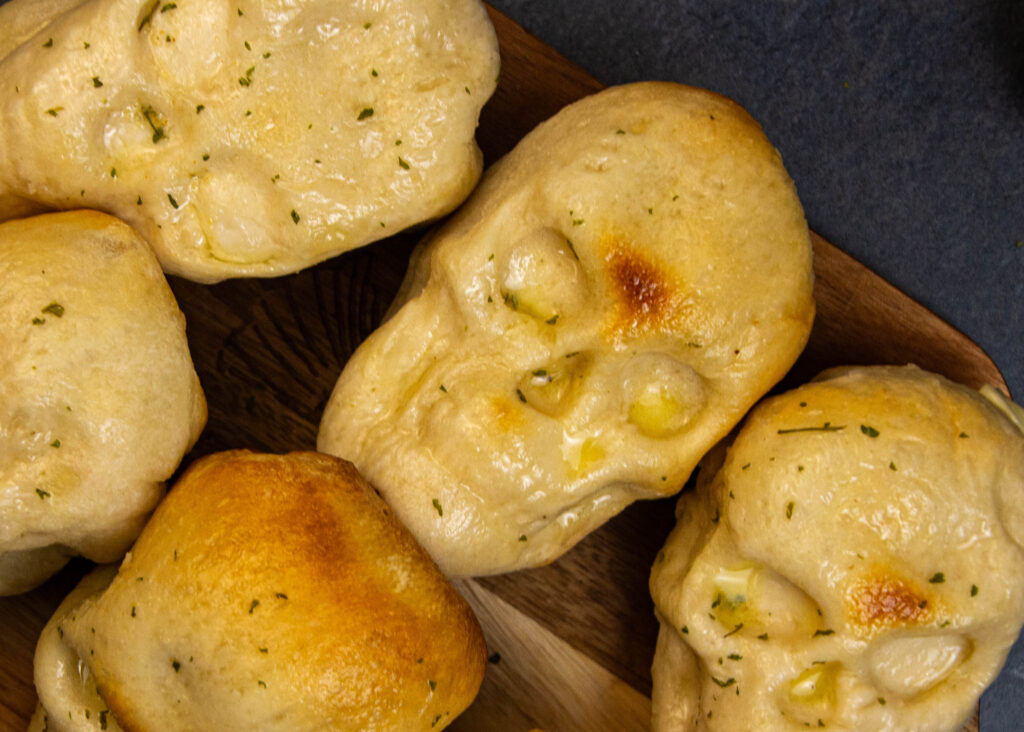
Halloween is all about fun, frights, and of course, delicious treats. If you’re looking for something savory to balance out the sweets on your Halloween spread, look no further than Halloween Cheesy Skulls. These delicious skull-shaped snacks are made from pizza dough stuffed with gooey mozzarella cheese and pepperoni, then baked to perfection and brushed with a garlicky butter glaze. Whether you’re hosting a Halloween party or just getting into the spooky spirit at home, Halloween Cheesy Skulls are a fun and festive way to bring some spooky flavor to your table.
What makes these skulls so special? Not only are they cute (or spooky, depending on how you look at them), but they’re also customizable. You can play around with the fillings, add different toppings, and serve them alongside your favorite dipping sauces. Plus, they’re easy enough to make, even if you’re not a baking pro.
Let’s dive into how you can bring these cheesy, buttery skulls to life this Halloween!
Ingredients
Halloween is all about fun, frights, and of course, delicious treats. If you’re looking for something savory to balance out the sweets on your Halloween spread, look no further than Halloween Cheesy Skulls. These delicious skull-shaped snacks are made from pizza dough stuffed with gooey mozzarella cheese and pepperoni, then baked to perfection and brushed with a garlicky butter glaze. Whether you’re hosting a Halloween party or just getting into the spooky spirit at home, Halloween Cheesy Skulls are a fun and festive way to bring some spooky flavor to your table.
What makes these skulls so special? Not only are they cute (or spooky, depending on how you look at them), but they’re also customizable. You can play around with the fillings, add different toppings, and serve them alongside your favorite dipping sauces. Plus, they’re easy enough to make, even if you’re not a baking pro.
Let’s dive into how you can bring these cheesy, buttery skulls to life this Halloween!
Assembling the Cheesy Skulls
Now that you’ve got all your ingredients ready, it’s time to start assembling your cheesy skulls. Here’s where you can get creative with your fillings. The beauty of this recipe is its flexibility, so feel free to swap out pepperonis for any of your favorite pizza toppings—mushrooms, olives, or even cooked sausage could work.
Preheat the oven: Start by setting your oven to 350°F (175°C) to get it ready for baking.
Prepare the dough: Roll out your refrigerated pizza dough on a flat surface. You’ll want to cut it into squares that are large enough to cover each section of the skull mold. If you don’t have skull molds, you can find them in most stores around Halloween or order them online.
Line the mold: Press each square of dough into the skull mold sections, making sure the dough covers the bottom and sides of the mold completely. This will create a pocket for your fillings.
Add the cheese and pepperonis: Place a block of cubed mozzarella and a few pieces of pepperoni into the dough-lined molds. You can add as much or as little filling as you like, but make sure to leave enough room to seal the dough.
Seal the dough: Fold the edges of the dough over the cheese and pepperoni, pressing them together to seal. It’s important to press the dough tightly to make sure the filling stays inside while baking.
Bake & Butter

Once your skulls are assembled, it’s time to bake them until they’re golden brown and crispy on the outside, with that ooey-gooey cheese filling waiting inside.
Bake the skulls: Place your skull mold on a baking sheet (this makes it easier to handle) and bake in the preheated oven for 20-25 minutes. Keep an eye on them as they bake—the goal is to have a golden, slightly crispy crust.
Prepare the butter mixture: While your skulls are baking, melt ½ cup of butter in a small bowl and stir in 1 teaspoon of garlic salt and ½ teaspoon of dried parsley. This mixture will give your skulls that irresistible buttery, garlicky flavor once they come out of the oven.
Brush with butter: When your skulls are done baking, remove them from the oven and let them cool slightly before carefully popping them out of the mold. While they’re still warm, generously brush each skull with the garlic butter mixture. The butter will seep into the dough, adding moisture and flavor.
Serve with dipping sauce: Serve the cheesy skulls hot with a side of warm marinara or pizza sauce for dipping. Each bite will be packed with cheesy goodness and just the right amount of spooky Halloween flair.
Cheesy Skull Filling Ideas

One of the best things about these Halloween Cheesy Skulls is how versatile they are. While this recipe uses the classic combination of mozzarella cheese and pepperoni, you can easily switch up the fillings to suit your tastes. Here are a few ideas to get your creative juices flowing:
- Mushroom and Spinach Skulls: Swap the pepperonis for sautéed mushrooms and spinach for a vegetarian twist. Add a sprinkle of Parmesan for extra flavor.
- Sausage and Cheese Skulls: Use cooked Italian sausage instead of pepperoni for a heartier filling.
- Buffalo Chicken Skulls: Mix cooked shredded chicken with buffalo sauce and mozzarella for a spicy variation.
- Olive and Feta Skulls: For a Mediterranean twist, try filling your skulls with black olives and feta cheese. Add some sun-dried tomatoes for extra flavor.
Feel free to mix and match your favorite pizza toppings to create a skull that’s perfect for your Halloween party or family dinner.
How to Store Halloween Cheesy Skulls
Halloween Cheesy Skulls are the ultimate Halloween snack—a little spooky, a lot cheesy, and super fun to make. Whether you’re hosting a Halloween party or just looking for a festive way to celebrate, these savory skulls will be a hit with kids and adults alike. Plus, with the ability to customize the fillings to suit your taste, the possibilities are endless.
So this Halloween, skip the candy and opt for something a little more creative (and a lot more cheesy). Trust me, these cheesy skulls will be the star of your Halloween feast!
Halloween Cheesy Skulls
Equipment
- Skull Silicone or Baking Molds
Ingredients
- 2 cans of Refrigerated pizza dough
- Cubed blocks of mozzarella cheese
- Pepperonis cut into small pieces
Butter Mixture
- ½ cup butter melted
- 1 teaspoon garlic salt
- ½ teaspoon dried parsley
Dipping Sauce
- Marinara or Garlic Sauce
Instructions
- Preheat the oven: Set your oven to 350°F (175°C).
- Prepare the dough: Roll out the refrigerated pizza dough on a flat surface and cut it into squares large enough to cover each section of the skull mold.
Assemble the skulls:
- Press each square of dough into the skull mold sections, ensuring the dough covers the sides and bottom of each cavity.
- Place a block of cubed mozzarella and some pepperoni pieces into the dough-lined molds.
- Fold the dough over the cheese and pepperoni, sealing the edges by pressing the dough together.
Bake:
- Place the skull mold on a baking sheet and bake in the oven for 20-25 minutes, or until the dough is golden brown and cooked through.
- Prepare the butter mixture: While the skulls are baking, melt the butter and mix in garlic salt and dried parsley.
Finish and serve:
- Once the skulls are baked, remove them from the oven and brush them generously with the garlic butter mixture. Serve hot with marinara or pizza sauce for dipping.


 •
#bakingtherapy #baking #cho


